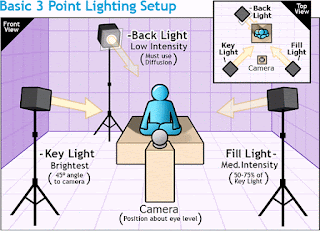
My television production/editing students study three point lighting. I like to give them a hands-on (and lights on!) project so they can set up the lights and take photographs to show the changes made by the use of the key, fill and back lights.
 |
| Room Lights Only |
Yuck! That pretty much sums up my reaction to this image. Yes I did sleep last night!
 |
| Key Light |
Now the "key" light is on. Plenty of light on my face now- but maybe too much!
A key light is defined in our textbook "Television Field Production and Reporting: A Guide to Visual Storytelling" (by Shook, Larson and DeTarsio) as the "primary or dominant light that illuminates a subject."
The key light, in this case, is right in my line of sight. It's very bright and harsh. This can be called "flat" lighting.
Better to position the key light to the right or left of the subject and not so much "in the face."
 |
| Key and Fill Lights |
The fill light is defined as a "secondary light source set to produce illumination approximately one-fourth to one-half as intense as the key light." Fill lights are softer, perhaps a box light set up. If nothing else, move the fill light back away from the subject to reduce its intensity.
In this example, the fill light is located to my left, giving more illumination to the left side of my face (and showing my gray hair even more, ugh!).
 |
| Key, Fill and Back Lights = 3 Point Lighting! |
Finally, the three point lighting is completed with the addition of the "backlight."
The backlight is placed opposite the key light and shined down on the subject from behind. This can also be called the rim light.
My hair is highlighted more and there is now more separation from the background.
If done properly, this shot should be the best of the lot due to the subtle enhancements the carefully placed lights can provide.
But in this case, I think this shot is my favorite.
This shows the fill light and the backlight and me among them.
This diagram, found online, is helpful in saying where everything should be in the three point lighting set up.


No comments:
Post a Comment